Full Instructions for Playing "Investigating Atrocity"
The simplified set of instructions is available on the “Play Now” webpage. This is a more elaborate set of instructions, particularly for people who do not have gaming experience.
Once the simulation loads on your browser (automatically), tap anywhere within the WebGL (play) screen, using your finger, to begin. You will need to read and agree to the Disclaimer and End User License Agreement (EULA), which has been kept quite simple and readable.
You can enlarge the WebGL screen by clicking on the blue box on the bottom right. If the button is not visible, you may have to shift the play screen to the right using the scroll bar, if present, to uncover the button. To exit full screen, swipe from rightmost of your screen to the center to “go back”, like you would when using any browser tab.
Feel free to review the Settings page before going to the Scene Select page. Start at Scene 1 if you are new to “Investigating Atrocity”. This first scene is a briefing from the Chief Military Observer (CMO) where you only need to click the right arrow to progress to the next slide. For other scenes you will need to move around. Scene 2 allows you to move around only after you finish your meeting with the CMO.
Movement

Once your selected scene loads, make note of the two joystick icons at the bottom of the screen.
The leftmost joystick is used to move the avatar around the environment. Movement is relative to the direction the camera is pointing. Movement in any direction will put the avatar at a constant walking speed. To run, the joystick must be moved to the outermost (dotted circle) circumference of the icon.
The camera is controlled by the rightmost joystick.
Note that in some cases, avatar movement controls are taken away from you for narrative purposes. This is evident in Scene 1 where you are shown a presentation. Similarly for the beginning of Scene 2, where you can still use the rightmost joystick to move the camera around, though it will not alter the avatar’s direction. Finally, during interactions (section below), like dialogue with non-playable characters, all controls are taken away to ensure the interaction is carried out.
Interactions
When interacting with a NPC (non-playable character) select the desired option (line) using your finger (e.g., to reply to a dialogue prompt). If no options are displayed, simply tap anywhere on the screen to advance to the next dialogue text. If you wish to see a character’s complete dialogue without waiting for the NPC to finish speaking, or for the words to finish typing, tap anywhere on the screen. You will, however, have to select a dialogue option when presented with them. Be cautious that you only tap one at a time unless you intend to skip interactions quickly.
Camera


Scene 4 (village) has a camera feature, allowing the player to take pictures. However, these pictures are not currently stored. To toggle the camera on and off, press the camera icon located on the top left of the screen. A box will appear when the camera is turned on (see right image above). To take a picture of an object, tap the screen with two fingers. The photo you’ve taken will then show on the screen. To remove it, tap once more with two fingers. To exit Camera mode, press the icon again.
First & Third Person View

Within the scene 4, the eye icon located on the top left of the screen can also be used to switch between first person view and third person view. Note that the first person view camera is temporarily reverted for dialogue interactions.
Mini Map
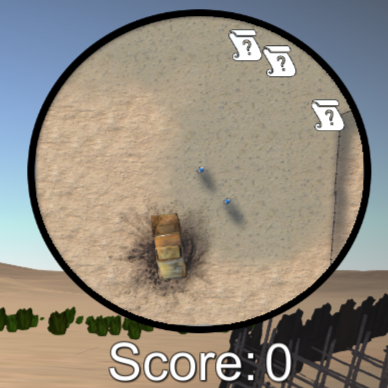

When in most scenes, the top right of the screen will display a small map. This will show an overhead view of your surrounding area, as well as the locations of interactions, displayed as question mark icons. If you get lost when playing, use this to get your bearings and also to get insight about the location of clues.
Pause Menu

Tapping the three horizontal bars icon, found at the top left of the screen, will pause the simulation and bring up the Pause Menu. To leave this menu and go back to the simulation, simply tap the icon again, or tap on the Resume button within the menu. If you wish to change the current scene, the Select Scene button will take you back to the Scene Selection page where you can enter whichever scene you like. The button below Scene Select is the Brief & References button. This will show you the original (Scene 1) brief with information relevant to your mission in Carana for you to consult again. The last slide gives internet links to UN training materials. In the menu, the Settings button (below Brief & References) will allow you to adjust the audio, graphics, and (written) language settings, just like in the Main Menu. Finally, you can choose to Quit the simulation. However, you will lose the score that you have achieved so far. Also, you will need to reload the webpage (circular arrow on your browser toolbar URL line for refresh) if you wish to play again from the start.
Help Menu & Character Names

Simplified instructions can also be opened within the simulation, while you play, by tapping the Mouse icon at the top left of the screen so that you don’t have to exit out of full screen or switch the simulation browser tab. Both activation inputs are used to toggle the instructions on and off. This same icon is used to toggle the display of character names when the camera is pointed at them.
Forcing an Exit
If you find yourself stuck, with the avatar unable to move or the simulation unable to progress in any way, attempt to use the Pause Menu to change the scene. This may fix the problem. If doing so did not fix the problem, or if you are unable to open the Pause Menu, you will need to refresh the page (restart the simulation) using the circular symbol next to the Home button at the top of the screen.
Normally, a player proceeds sequentially from Scene 1 to 6. You will use the information that you gain from the first five scenes to fill out the final report in Scene 6, which also gives you a score for both your gameplay and your report. You can play this over as many times as you wish to get a better score and learn more about peacekeeping.
Enjoy the simulation!